Ever shouted into a cave? Or ‘yee-hawed’ down the Grand Canyon? Maybe you’ve heard an echo in a large bathroom? In each case, you would have heard what convolution reverb is based on.
Did you notice how the sound in a cave takes longer to fade out than in a bathroom? The way sound reflects off of surfaces can be affected by several factors – the size and shape of the room, the type of surface, and the distance until sound hits a surface. Reverb is probably the most widely used sound effect. Its possibilities are nearly limitless.
Dave Gilmour’s guitar solos would sound remarkably dull without reverb. Adele’s booming vocals would sound much smaller, and Radiohead would be more like Radiodead. Convolution reverb helps give these sounds their magic. Let’s break it down.
What is convolution reverb?
You’ll usually find digital reverbs split into two categories: algorithmic and convolution. Algorithmic reverbs use math formulas to imitate rooms of all sizes and characteristics. Many of the algorithms are modeled after real locations.
Conversely, convolution reverbs are where audio engineers and sound designers head out on location, create a sound, and capture the reverb. They then use this special recording to sprinkle a lifelike echo onto your sounds, making them sound more authentic.
Convolution reverb plugins often have presets such as “mountain echo,” “submarine,” or “Nevada cave.” In each case, you can be sure someone has visited these places and faithfully captured their sound. Pretty cool, right? And what they are capturing is known as an Impulse Response, which we’ll elaborate on shortly.
So, what does this mean in practical music-making terms? Why does it matter? For one, convolution reverbs give you the sound of places that are impractical to actually record in and capture their natural reverb. And secondly, we’re not just referring to exotic natural locations. Convolution reverbs also feature the sound of iconic studios – think Abbey Road, London, or Capitol Studios, Los Angeles. You’ve got the world at your fingertips.
This, in part, makes convolution reverbs a particular favorite for scoring and films and video games. In both disciplines, the music often needs to sound like it’s in a specific space within the scene or gameplay. That’s achievable with convolution reverb.
How does convolution reverb work?
Convolution works by applying the sonic character of an impulse response to another sound in real time.
Great, but what is an Impulse Response (IR)? It gets its name from two components – the impulse and the response. Imagine you’re in an empty room, and you clap your hands. The initial clap sound is the “impulse” and the sound that bounces around and gradually fades is the room’s “response.”
In the audio world, an impulse response is a recording that holds all the information about how a space reacts to sound waves. Think of it like a snapshot of the location’s sonic personality. This recording is the secret ingredient in convolution reverb.
When you want to recreate the feeling of a specific place, you mix your audio with a convolution reverb effect preset from that space’s impulse response. It’s as if your audio borrowed the room’s voice, sounding like it’s naturally there. For example, if you want your music to seem like it’s playing in a concert hall, use an impulse response from that hall.
Going deeper, modern convolution plugins give you common reverb controls such as pre-delay, decay and size to amend the IR. Therefore, if you’re unhappy with your Abbey Road IR, you can tweak it to taste.
DAWs offer capable convolution reverb plugins natively, like Space Designer in Logic, and Hybrid Reverb in Live, but independent plugin developers have pushed the envelope the most.
Top Convolution Reverb Plugins
Everything sounding good so far? Great – read on for an overview of some of our favorite convolution reverb plugins.
Audio Ease – Altiverb
Audio Ease’s Altiverb was the first convolution plugin released in 2001. It remains a leading player with a range of robust features that make it an indispensable production tool.
Let’s address the price upfront. It’s almost $600 for the regular version, and the XL edition $900 for the XL edition.
The XL is a significant upgrade with up to 5.1 surround input and output and 384 kHz sampling rates. The regular version only offers stereo input and output with up to 96 kHz sampling rates. These enhancements make the XL version more suited to high-level professional applications. To our knowledge, it’s the most expensive standalone effects plugin on the market and one of the most expensive in any category.
It’s worth the investment. If you want the sound of iconic places, Altiverb is for you. It includes IR from concert halls like the LA Philharmonic’s Disney Hall and The Royal Academy of Music’s Duke’s Hall, huge sporting arenas like Wembley Stadium and Antwerp Sports Stadium, and even touchstones of global civilization like The Great Pyramid of Giza’s King’s Chamber.
If that’s not enough, users can load their own IRs Altiverb. For composers in particular, Altiberb extends its magic to surround sound setups, making it an ideal choice for projects demanding immersive audio.
As you’d hope at this price level, Altiverb excels in all areas. Its intuitive integration into your DAW streamlines workflow, while its interactive visualizations grant users insights into the intricate interplay of sound within spaces. This understanding facilitates meticulous tweaking, enabling users to achieve the desired auditory result.
Altiverb immediately set the benchmark for replicating reverberation and spatial characteristic. It remains a must-have for any serious producer.
Price: $500 for regular, $899 for XL
Pros: The best sounding, most versatile convolution reverb available
Cons: The price!
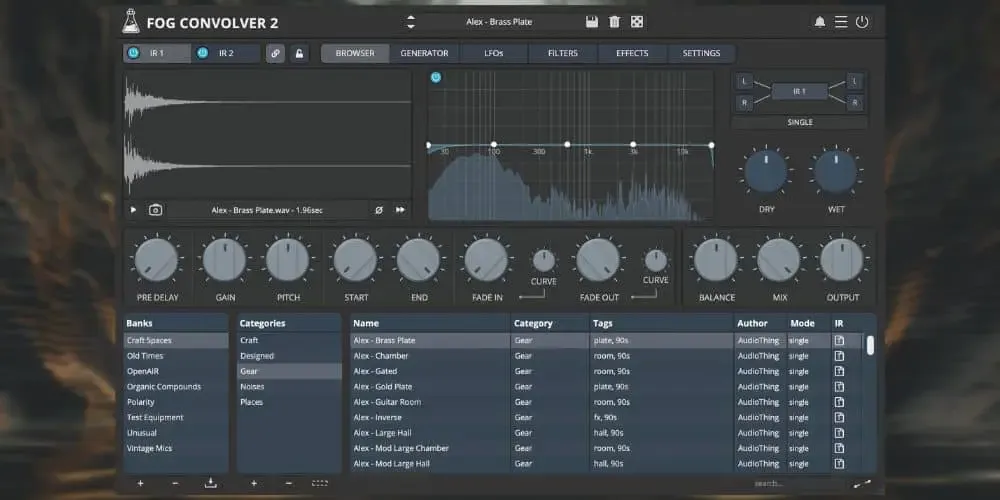
AudioThing – Fog Convolver 2
At just $69, you can’t expect all the high-end IRs that come with Altiverb. But Fog Convolver 2 still comes with 660 IRs.
One of our favorite features is loading two impulse responses and having separate or linked controls for both. And developing that idea further, Fog offers five different routing modes to arrange the impulses: single, serial, parallel, parallel mix, and true stereo. A mix engineer’s dream.
But it doesn’t stop at stereo; it seamlessly integrates into surround sound setups too, catering to modern sound design. If you don’t want to use any presets, you can use the Impulse Generator to design an IR from scratch. No other plugin in this list offers that capability. Fog also has significant modulation features with 2 LFOs, 10 waveforms, and 18 assignable destinations. You can shape your sound even further with Fog’s multi-mode filter (with pre, IR, or post modes) and a 5-band graphic EQ.
The IRs themselves lean towards lo-fi, unusual, and rare rather than high-end locations. That’s the charm. We particularly like the Hainbach-inspired Test Equipment Bank and the Bitwig Guru Polarity Bank, which uses white noise, Dirac samples, granulators, and modulators. Simply name-checking either of those individuals reveals the quirky nature of Fog Convolver 2.
Price: $69
Pros: Extensive feature set, true stereo, can import your own IRs, easy to use, and rare sounds
Cons: Doesn’t have high-end locations, but it doesn’t claim to have them either
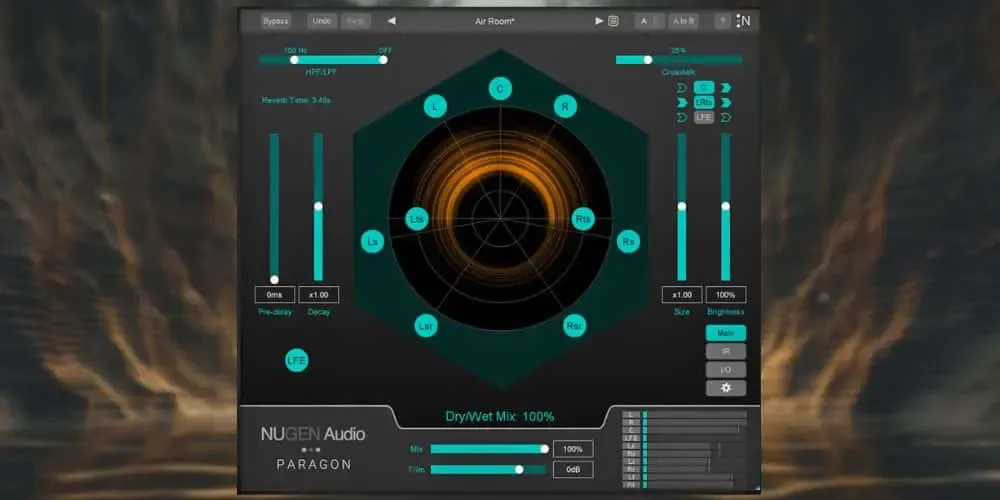
Nugen Audio – Paragon
Paragon is unique as it only comes with a handful of IRs. Instead of huge preset banks, they compete on ‘tweakability’. As they say, “Why have 30 recordings of different-sized churches when you can meticulously adjust the characteristics of one church?”.
So how do they justify the $500 price? Well, Paragon is the first convolution reverb to offer, via re-synthesis, full control of the decay, room size and brightness of reverbs modeled on 3D recordings of real spaces. This avoids the common issues of time-stretching, unwanted artifacts, and CPU overload. Furthermore, The IRs come with brilliant spectral analysis and precise EQ functionality.
With its revolutionary 3D recording, Paragon is perfect for a Dolby Atmos workflow. The built-in crosstalk feature adds an unprecedented sense of liveliness and even enables surround reverb from mono sources – such as a single mic’d guitar amp.
Going deeper, Paragon can determine how reverb works with separate channels. For mixing purposes, this can improve dialog by removing unwanted reverb from the center channel whilst also maintaining a sense of space by sending the dry center to other reverb channels.
To summarise, for composers Paragon is the convolution reverb.
Price: $599
Pros: Groundbreaking 3D IR, incredibly powerful features
Cons: At almost $600, it’s not an impulse purchase
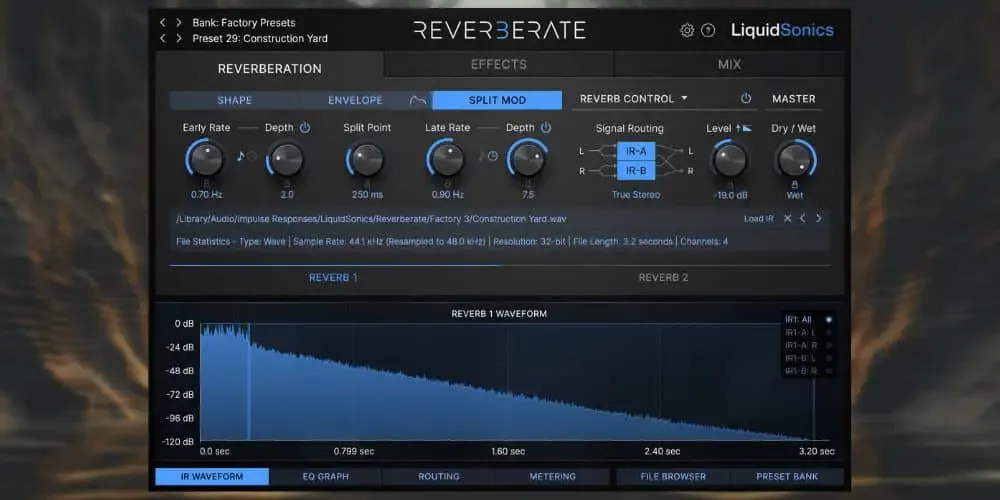
LiquidSonics Reverberate 3
Reverberate 3 capture’s the impulse responses of iconic hardware reverbs and makes them sound better than ever before.
With their proprietary Fusion-IR technology, Reverberate has editing and modulation tools that ensure your IRs are more dynamic and realistic than static convolution. For example, you can blend the early reflections of one piece of classic hardware sounds with the tail of another. Hardware reverb units like Lexicon 224 make this possible, but Reverberate 3 is the only reverb plugin to support this capability.
Many hardware reverbs only apply pre-delay to the reverb tail, which means the reflections are not unnaturally separated from the dry sound as pre-delay is applied. For most convolution reverb effects, applying additional pre-delay would dramatically unglue the reflections. With Reverberate 3 you can shift the late tails forwards and backwards in time independently. And using the modulation tools, you can tweak and modulate each IR separately.
Reverberate 3 also offers a non-pitching mode. This offers a short burst of chorusing modulation in the first few milliseconds, followed by natural fixed pitch modulation to the end tail. Using this technology, you can develop IRs that take reverb into new territories.
Price: $99
Pros: Highly qualified and innovative. Priced attractively.
Cons: Requires iLok dongle
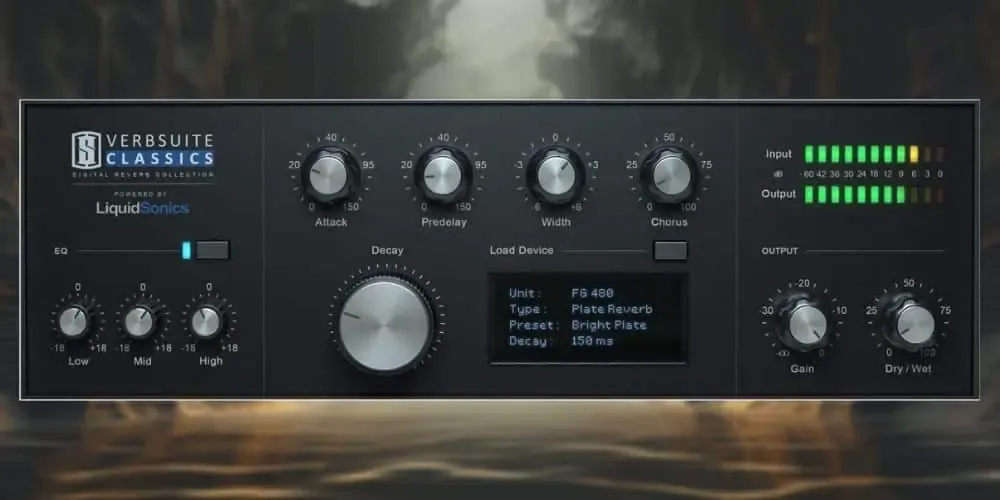
Slate Digital VerbSuite Classics
VerbSuite Classics is a partnership between Slate Digital and LiquidSonics. So how does VerbSuite manage to differentiate?
Ultimately, ease of use is the main appeal. LiquidSonics were never going to relinquish everything to VerbSuite, which makes the latter more like a slimlined Reverberate version. This is great if you’re starting out. Its simplicity makes it incredibly easy to use, while still sounding great.
The UI gives you intuitive controls with no hidden advanced menus: just a few large knobs such as Decay, Attack, Predelay, Chorus, and Width. For further sculpting, there’s a rudimentary three-band EQ. In terms of processing, VerbSuite offers much less than others on our list.
But it makes the list as it’s a great first plugin. It still sounds amazing thanks to the borrowed Fusion-IR technology which powers the iconic sounds. It’s packed with classics such as the Lexicon EMT 250, the Lexicon 480 (the world’s first digital reverb famous for its beautiful modulation) and the versatile AMS Neve RMX-16 (a key contributors to the sound of the 80s). The icing on the cake however is probably the universally adored Bricasti M7 – the king of room reverb. That’s a lot of heritage in one plugin.
Price: $150 annual subscription
Pros: Can be bought on subscription with the Everything Bundle for a $14.99/month or $149.99/year subscription.
Cons: Pricing is subscription-based only. Needs up to 17GB desktop storage. Not enough tweak options
Top Tips for Using Convolution Reverb
Understanding how to use convolution reverb is even more important than knowing which plugins to consider. Below you’ll find some key techniques to keep in mind for your production workflows.
Tip 1: Make your own
The great thing about convolution reverb is you can make your own and import them into your device. If you want a deep dive on the process, The Pro Audio Files has you covered, but as a summary, consider the following:
Record different unique spaces: Everywhere you go, impulse responses are all around you. Don’t overlook the uniqueness of your house, bedroom or garage.
Use different microphones: Try a high-end condenser, a cheaper dynamic, or even your phone microphone. Layering different microphones to capture IRs is a commitment, but can pay off in the long run.
Change your impulse: A simple hand clap can be effective but experiment with other impact sounds – drop a ball, slam a door, scream, throw coins on a tile floor. They will all react differently, and you can layer them in the mix later.
Tip 2: Choose the Right Impulse Response
Impulse Responses come in many shapes and sizes. Spend some time getting to know them. Below are some common starting points:
Take your time: The heart of convolution reverb lies in the (IR) you select. Take your time exploring different IRs in your library to find ones that best match the mood and environment you’re aiming for.
Choose wisely: If your music is meant to be in a cathedral, choose cathedral presets and go from there. Study what makes a cathedral IR and then build your own, such as with Impulse Generator in Fog Convolver. Consider which instrument(s) the convolution reverb will be applied to and choose accordingly. A cathedral IR might sound great on one instrument but wash out your track when applied to the entire mix.
Tip 3: Blend and EQ Thoughtfully
Process your reverb with care to ensure the mix stays on track. Here are some suggestions:
Watch the low frequencies: Convolution reverb can sometimes exaggerate unwanted low-frequency content, especially in large spaces. To ensure your reverb doesn’t overpower your mix, consider using EQ to shape the frequency balance of the reverb. You can roll off excessive low-end frequencies to maintain clarity.
Wet/dry mix: Adjust the wet/dry mix to strike the right balance between the original and reverberated sounds. This helps prevent your mix from sounding washed out or overly saturated.
Tip 4: Consider Early Reflections
Early reflections can greatly improve the way your sound responds in the mix. Here’s a couple of pointers:
Don’t overlook early reflections: While the tail of the reverb is often the focus, don’t overlook the importance of early reflections. They contribute to the sense of space and realism in your mix.
Tweak early reflection: You can separately adjust the intensity and timing of early reflections. Tweak these settings to create a natural and immersive sonic environment. Careful manipulation of early reflections can make your audio feel like it truly belongs in the chosen space.
Final Thoughts
Convolution Reverb is one of the most compelling production tools in your kit. As we’ve said before, check if there is a native convolution reverb plugin in your DAW to start with. Next, deploy some of our top tips, and once you are more familiar with the process, buy one of these more powerful plugins from our list.
Knowing your way around reverb is a key skill for any sound designer, composer, producer, or musician. Become an expert on convolution reverb, and you’ll be well on your way.