Low Frequency Oscillators (LFOs): The Ultimate Guide
James Hamilton
When you’re creating new patches and designing sounds, do they sound static? Without rhythm, groove, dynamics, or a sense of movement? If so, what should you do to fix it? Enter the unsung hero of sound design and production, the LFO, or Low-Frequency Oscillator.
The humble LFO can also add rhythm and groove to your music. But it does more, lots more. It can create harmonic modulation and other mind-bending effects. Imagine a tiny, invisible force pushing and pulling your music, creating mesmerizing wobbles and pulsations. That’s how an LFO, or many LFOs, can affect your music.
In this article, we’ll run through each feature of an LFO, explain their function, and round off with some top tips for using LFOs in your music.
Let’s dive in.
What is an LFO?
So what is a LFO? It’s a waveform generator that operates at such a low frequency that it’s inaudible to humans. Instead of producing audible tones, an LFO generates a continuous, low-frequency wave, usually in the 0.1 Hz to 20 Hz range (or even lower). LFOs are fundamental to synthesis and electronic music production.
Being inaudible, the LFO waveform is primarily used in synthesizer sound design and patch creation to modulate other parameters. Applying the LFO to elements like pitch, volume, or filter cutoff allows you to add depth, movement, and texture for unique and expressive musical textures.
If you need help to grasp the concept, think about dubstep. It’s one of the most apparent examples of LFOs. The ‘dubstep wobble’ is an LFO modulating the filter cutoff frequency on a synth patch.
LFO Waveforms and Their Differences
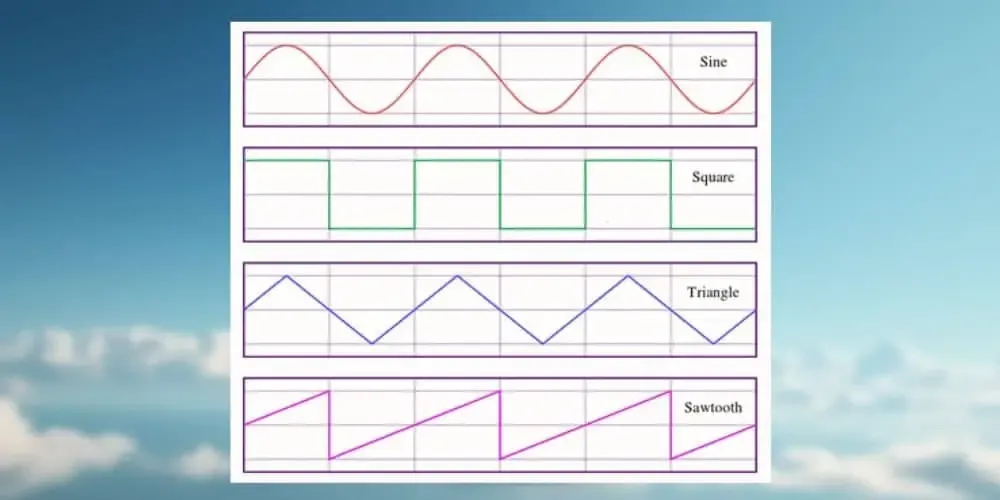
LFOs can generate various waveform shapes, each offering different approaches to modulation. The most common LFO waveform shapes include:
Sine Wave: Smooth and continuous, producing gentle and subtle modulations.
Triangle Wave: Similar to a sine wave but with sharper peaks and troughs, creating a slightly more pronounced effect.
Square Wave: Abruptly switches between two voltage levels, resulting in distinct on/off modulation.
Sawtooth Wave: Increases linearly and drops abruptly, creating a ramp-like shape with a distinctive rising or falling effect.
Ramp Wave: Similar to the sawtooth but with an opposite slope, producing the opposite rising or falling effect. Some synths refer to it as a ‘reverse saw.’
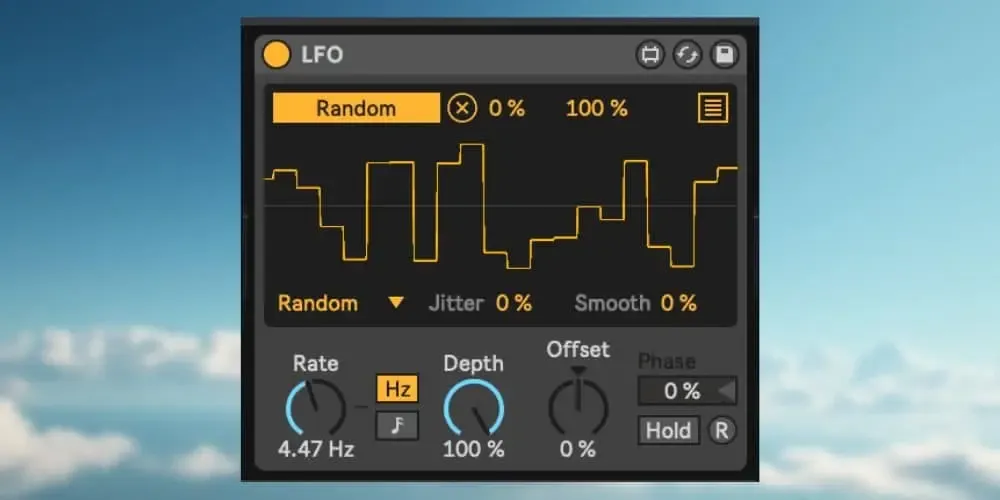
Random, or Sample & Hold: Generates random values at a fixed rate, creating unpredictable and chaotic modulations.
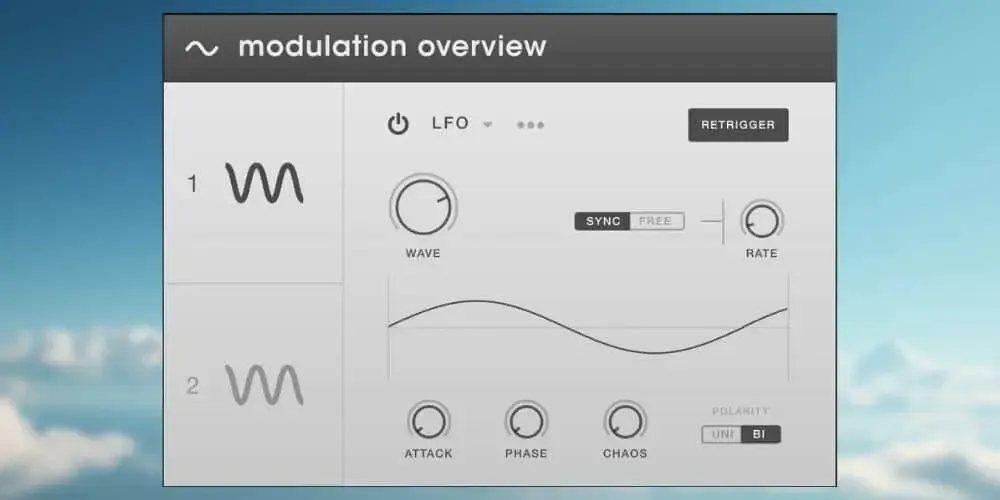
LFO Rate
Now that we’ve established the most common shapes at our disposal, the next step is to understand ‘rate.’
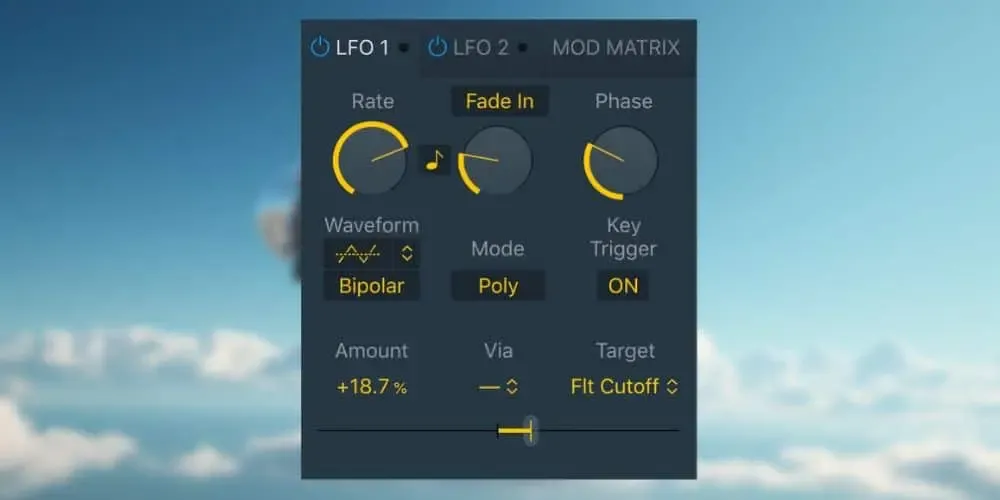
The LFO rate refers to the speed at which the LFO cycles through its waveform shape. In layperson’s terms, the rate is how fast or slow the waveform moves. If you increase the rate, you’ll get faster modulation as the LFO cycles through its waveform shape more quickly. The opposite applies if you decrease the rate; it takes longer for the LFO to cycle through its waveform cycle.
Rate is commonly measured in Hertz (Hz), representing the number of cycles or oscillations per second. The rate can also be synchronized to the session’s tempo so that the effect of the modulation works with your track rhythmically. With your LFO sync setting turned on, rate settings will align to beats/steps and their divisions at the selected tempo setting.
If you don’t wish to be fixed to the grid, you can turn divisions off and set a rate independently of any divisions. Going ‘off grid’ works well for interesting overlapping “polyrhythmic” modulations that can sound more human.
LFO Amount
After rate you will want to set the amount. Amount refers to the intensity or strength of the LFO(s) on its destination parameter.
Increasing the Amount will result in a more pronounced or extreme modulation effect, while decreasing it will make the modulation subtler or less intense. It determines the depth or extent to which the LFO shapes and manipulates the sound, giving you precise control over the modulation level in your music or sound design.
If that still seems complicated, consider amount like a mix control or dry/wet setting that sets your LFO modulation levels.
Other Key LFO Features: Reset/Retrigger and Key Sync
Now for the last couple of fundamentals to grasp on an LFO. One is “retrigger,” often abbreviated retrig. In Ableton Live’s LFO device, this feature is called ‘reset’.
When the retrig function on an LFO is enabled, the waveform restarts or resets its cycle each time it receives a trigger signal. When retrig is active, the LFO waveform always begins its cycle when triggered, ensuring that modulation effects are consistent and synchronized with the trigger events. So if you want exactly the same modulation settings for each note, use reset for tight and predictable control over how the LFO modulates parameters in your sound.
Key Sync ensures that the LFO waveform cycle always starts from 0, which results in consistent modulation of each voice. If the LFO waveform cycles were not synchronized in this way, individual note modulations would be uneven.
Retrigger and Key Sync are related but distinct concepts. Key Sync focuses on aligning LFO modulation with the musical timing, while retrigger is concerned with restarting oscillator waveforms or envelope generators for new notes to ensure clean and distinct note articulation. Both features contribute to an LFO’s effect on the overall musicality and control of a synth.
Remember we mentioned LFO’s are all powerful and can add compelling rhythm and modulation to your music? Hopefully, now it’s clear why!
Key Techniques for Synth Patch Sound Design
With all that on board, let’s look at some top tips by exploring common LFO routings.
Vibrato
Let’s start with a bonafide classic, using an LFO to create vibrato! Vibrato is a common technique with stringed instruments and the human voice but is equally at home in electronic music. It involves a regular, rapid variation in pitch. Musicians achieve vibrato by slightly oscillating the pitch of a note while consistently returning to its fundamental pitch.
This ‘slight oscillation’ can be done by assigning an LFO to the pitch or oscillator frequency of your synth. Use a subtle amount of a sine wave LFO for a modern, queasy feel. A triangle wave can also deliver effective results, but the modulation curve will have sharper peaks and troughs.
Generally speaking, with vibrato, you want a relatively slow rate, around 4-6 Hz. This will create a gentle and musical wavering effect. If you don’t want the vibrato on continuously, set the LFO amount to zero, then create another modulation by assigning the mod wheel to the LFO amount. This allows you to “play” the mod wheel to activate the vibrato and dial in the intensity in line with the phrases you’re playing, giving your patch a compelling performance element.
Essential listening:
Jean Michel Jarre – ‘Oyxgen IV’ i
Whitney Houston – ‘I Will Always Love You’
Tremolo
Tremolo is where the volume or amplitude of a sound rapidly fluctuates. It adds dynamic texture and rhythmic interest to music across various genres. Apologies to any guitarist readers – the “tremolo” (or whammy) bar on your ax is technically creating vibrato… at least in synth terms!
To add tremolo to your patch, assign an LFO to the amplitude (volume) using a sine, triangle, or square wave. You can also automate the rate. Try a faster setting during your chorus and a slower one in the verse part of your arrangement.
But there’s more! Change your LFO to a square wave, and you’ve got yourself a 90s trance gate. This classic (perhaps overdone?) production technique has seen a resurgence recently with top producers like fred again. and Skrillex. The desired effect of a trance gate is essentially fast rhythmic tremolo on a key element of a track. To create, keep LFO rate synchronized to your DAW’s session tempo. A 16th or 32nd note rate will probably do the trick, but it never hurts to experiment with different tempos.
Essential listening:
The ‘trance gate’ Gouryella – “Gouryella”
The Beach Boys – ‘Good Vibrations’. The theremin is iconic for its not-so-subtle tremolo.
Pulsewidth Modulation (PWM)
PWM is a modulation technique commonly used in synth-based music to create unique timbral variations in sound. Chiptune music (or 8-bit music) is well known for using PWM, as it gives classic square wave sounds a distinctive character. If you’re searching for your inner ‘Hadouken’, then get familiar with PWM. It can also give synth pads a lush, chorus-like quality with subtle movement that evokes a string ensemble.
PWM involves varying the width (duration) of a square wave to change the harmonic content of the wave and overall timbre of the sound. When done well it creates harmonic-rich tones. All you have to do is route the LFO to modulate the pulse width of your square wave oscillator.
Essential listening:
Kraftwerk ‘The Robots’
Super Street Fighter II OST
Synth Pads
Perhaps the simplest and most effective use of an LFO is to inject pads with liveliness and movement. Unless you’re producing ambient music, synth pads tend to sit in the background of the track, but that doesn’t mean they have to be boring! The PWM technique described above is great for pads. Add one (or several!) other LFO techniques to enhance your pad’s overall texture. In general, lower LFO rate and amount settings serve as good starting points.
A common technique is to assign a triangle or sine LFO to the filter cutoff for a slow, subtle filter sweep that adds movement to the pad’s harmonic content. The effect varies depending on the type of filter in use (e.g. low pass vs high pass vs band pass vs notch), the initial position of the filter cutoff frequency, and the resonance settings. Experiment with different settings and listen for what works best for how the pad’s supporting the track.
Other common techniques involve assigning a slow triangle or sine LFO to the Oscillator Frequency or Pan settings. The former approach creates the vibrato effect described above, but for pads, you typically want even lower and slower LFO amount and rate settings for a very subtle variation in pitch that makes your pad shimmer that much more. The latter approach automates panning so that your pad moves dynamically throughout the stereo field.
Advanced LFO Techniques for Synth Pads
Now, let’s take the approaches in the section above to the next level. Many synthesizers allow you to use key tracking as a modulation source. This decreases or increases the effect of the modulation as you play up and down the keyboard, and it’s incredibly powerful for dialing in your pad’s vibrato. With your LFO already assigned to oscillator frequency, next assign key tracking to the rate of the same LFO modulating the frequency. This increases the vibrato’s effect on the upper voices, creating progressively faster vibrato on higher notes. This is great when using pads for chords with several high voices, creating a lush shimmering high end. It also minimizes the effect of the vibrato on the low voices, saving you from unwanted movement in the low end that can introduce problems at mixdown.
You can also take panning modulation to the next level when using pads for chords. Many polyphonic synthesizers offer a “pan spread” setting that moves individual voices across the stereo field dynamically. By assigning a sine of triangle LFO to the pan spread setting and playing chords with many voices, those voices will dynamically shift back and forth across the stereo field for an incredible sense of depth and motion.
Essential listening:
Synthwave Voyager’ Horizon’
The Dubstep Wobble
You didn’t think we’d leave this one out, did you? One of the most famous LFO applications is the ‘dubstep wobble.’ It works on basic subtractive analog synthesizers with square or saw waves. It can sound even more intense with wavetable or FM (frequency modulation) oscillators that offer an even more complex harmonic structure.
Use a triangle or sine LFO to modulate the oscillator’s pitch, the wavetable position or LFO amount, and/or the filter cutoff to create the signature ‘wobble.’ Assigning the same LFO to all 3 sources creates an even “bigger” wobble since the pitch/frequency, wavetable position (or LFO amount) and filter cutoff all move in tandem. Also, be sure to adjust the filter cutoff and resonance to shape the character of the sound.
And while we’re here, add distortion or overdrive for that ‘gnarly in your face’ bro-step wobble.
Essential listening:
Skrillex Scary Monsters and Nice Sprites’
Benga ’26 Basslines’
LFO to LFO Modulation – Movement on Movement!
We’ve looked at ways LFOs can control parameters within your synth or settings in your DAW. But you can set an LFO to modulate another LFO. In fact, you can set multiple LFOs to modulate each other if you wish for “Inception” level modulations within modulations.
A great way to trial this is to create a more straightforward initial modulation with your first LFO. For example, start with a sine or triangle LFO at moderate rate setting, and assign it to filter cutoff. Next, use a second sine or triangle LFO to modulate the rate of the first LFO. The creates an effect where the speed of the back-and-forth filter sweep increases and decreases. You can use the second LFO’s amount setting to dial in the intensity – higher second LFO rate settings creates a more pronounced woozy effect.
Another approach is to assign a sine or triangle LFO to modulate the FM amount on a synth. Now, set another LFO to modulate the rate of LFO 1. This will make the FM modulation automatically increase and decrease, making the sound alternate between a more straightforward texture to a harmonically-rich. Your results may vary based on other synth patch settings, but have a go – it’s a lot of fun.
Essential listening:
Noisia’ ‘Dead Limit’
R2-D2
So far we’ve focused on techniques using smoother LFO waveforms with consistent, periodic movement. Just for fun, why not dive into the Random LFO waveform and understand how R2-D2 got its voice? This classic synthesizer technique can really only be created with the random LFO wave setting, also known as sample and hold, which sends a series of random wave positions to the target.
To create a sound reminiscent of R2-D2, assign an LFO with a random sample and hold waveform to the filter cutoff. Make sure your filter resonance is cranked all the way up to the point of self-oscillation. Keep your LFO rate fast, too. Soon you’ll be right there in the X-wing cockpit shooting down Imperial ships. If that fails, use ‘The Force’…
Final Thoughts
For beginners, “low frequency” may mislead you into thinking LFO techniques are limited to low end, bass sounds. But as we’ve illustrated throughout this article, LFOs have an incredibly wide range of applications across the entire frequency spectrum. LFOs can enhance any synth patch, going a long way in elevating your production skills. They are an ultimate control weapon.
New producers often spend hours creating needlessly complex automations to achieve more ‘liveliness’ in their tracks. With LFOs, you don’t need to work so hard. There’s no harm in creating deep automations, but by learning your way around LFOs, you can let the machines do the work for you.